Dialing in Polymaker PolyWood: Not My Favorite!
Polymaker PolyWood is a 3D printing filament designed to be ultra-matte and mimic the appearance of wood filaments – plastics with wood particles mixed into the material – without the hassle of actual wood particles, which can cause nozzle clogging. It’s also the filament that, in my limited time printing, I have had the most frustrating time trying to dial in.
It’s common when receiving a new filament to print some calibration objects and adjust your print settings based on the results. Calibration lets you learn the best settings for the combination of your printer and the filament you’re using.
SuperSlicer is a community maintained fork of PrusaSlicer, which is the official slicer from Prusa – who also make my printer. It has added features on top of PrusaSlicer, including the ability to generate some handy calibration models. Because it is released less frequently than PrusaSlicer, it is an odd combination of more feature-ful but less cutting edge. I tend to do calibration in SS, but then migrate those settings to PS where I do most of my day-to-day slicing.
My usual calibration process is:
- Print extrusion multiplier calibration chips in two rounds (coarse and fine-tuning) to dial in the extrusion multiplier – a factor that adjusts how much material gets pushed through the nozzle to extrude a line.
- Print a temperature tower to dial in the temperature range that makes the filament strongest, creates the cleanest bridges and features, and has the least stringing.
- Print a retraction test to dial in the retraction setting that minimizes stringing caused by filament oozing as the nozzle moves from one location to another.
My calibration process this time was:
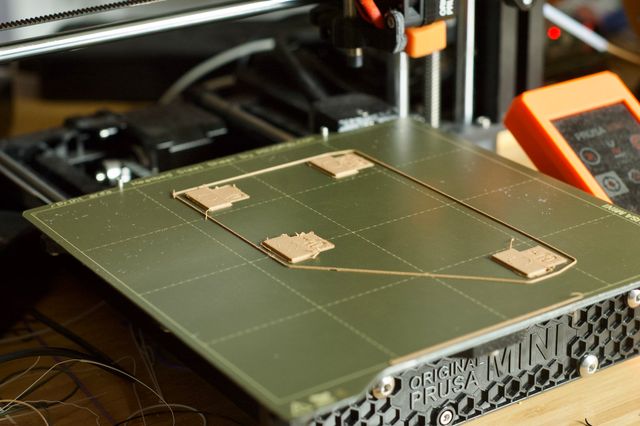
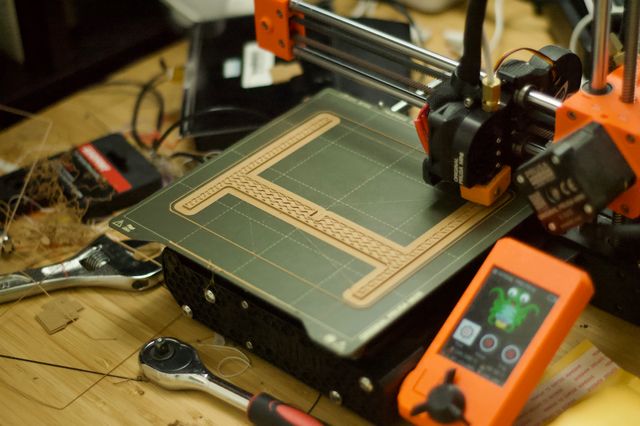
I attempted to print the extrusion multiplier calibration chips, but struggled to get the print to stick to the bed within the advertised range of settings, despite washing the bed multiple times to ensure it was free of oils and despite trying multiple bed temperatures within the recommended range of 30–50°C (quite low compared to other PLAs in my collection).
Finally the print stuck tolerably with the bed temperature at 60–65°C, well outside of the recommended range. It was still pretty messy and required some babysitting.
I printed two rounds of calibration chips resulting in a extrusion multiplier of 1.21 – quite a bit higher than almost any other filament I use. My best theory for why such a high value works here is: PolyWood achieves its matte effect by being a foamed plastic¹ and therefore low density. When it gets pushed through the heated nozzle some of the foam collapses and the extruded plastic is higher density, resulting in less volume per length of filament pushed through.
I printed a temperature tower:
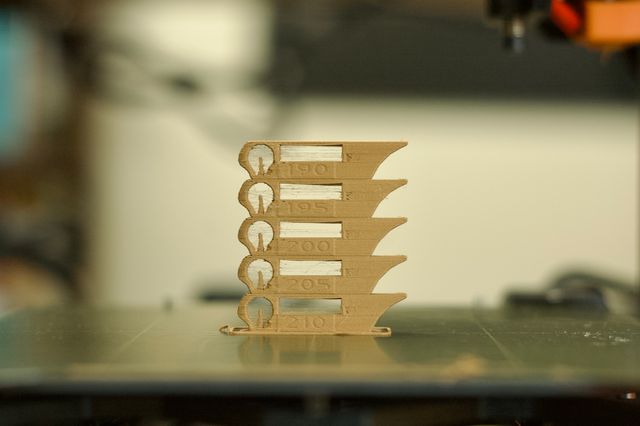
All of these temperatures look kind of rough, but I guess 200°C looks the least bad. You can also see that I still had some issues with a messy first layer.
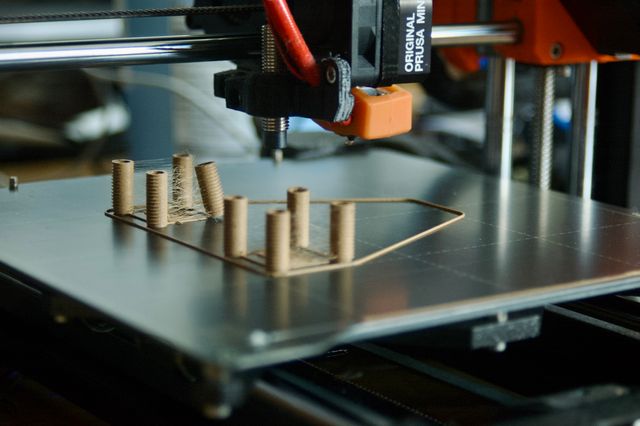
Finally, I printed my retraction test:
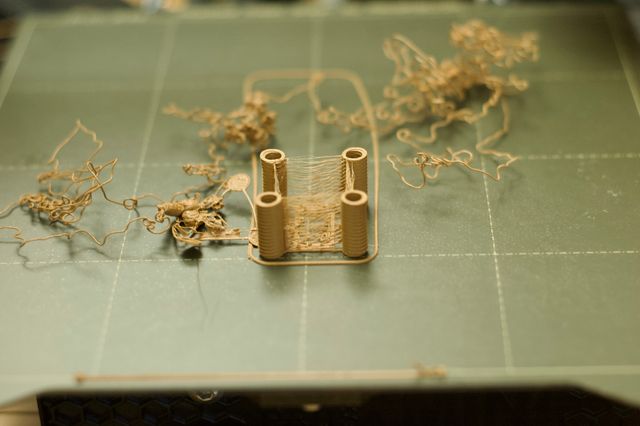
There is no retraction level in a reasonable range on my extruder at which the filament is not stringy. I’m just going to have to choose prints to minimize nozzle travel and accept some post-processing work.
You might also notice in the background that I tried to print a second retraction test, but walked away from the printer too soon and didn’t notice that it hadn’t stuck to the bed, resulting in a string monster.
These are the settings I arrived at:
- Bed temp (first layer): 65°C
- Bed temp (other layers): 60°C
- Extruder temp (first layer): 205°C
- Extruder temp (other layers): 200°C
- Extrusion multiplier: 1.21
I didn’t quite stop here. It actually took me a few months to finalize this blog post because I knew when I was drafting it that other 3D printing folks would tell me that my problem is “wet filament.” Certain types of plastic are hygroscopic and can absorb moisture over time that creates problems when printing ranging from stringing (as seen here) to poor layer adhesion to inconsistent extrusion. Annoyingly, though, this seems to be the community’s go-to answer for every problem, even when it’s not the actual issue. But this month I finally gave in and bought a filament dryer² and dried the filament for 36 hours to see if it would help. It did not.
I did notice that when I printed a couple parts on “quality” settings, which print slower, some of the stringing and adhesion issues were reduced, though not gone completely. It’s possible there’s room to play with printing even more slowly.
I also found that including a brim³ helps establish bed adhesion so as not to mess up the model itself. Printing more than two perimeters from the inside out also seems like it would be a good approach here.
Overall this is the fussiest filament I have worked with to date and was frustrating to dial in. Ultimately I’m not even that taken in with the appearance. When printed in solid it looks like a cross between plastic and cardboard – in my opinion, it looks cheap. I think it’s best when printed in a shape where it can plausibly simulate a very even-grained wood. Thin dowel/skewer shapes look OK. But at $30 for a 600kg spool, it’s a fair bit more expensive than other filaments I use.
I probably won’t buy another batch, but as long as I have this spool, I might as well see if I can make some things I like with it.

Classic Planter design by Brian Hendricks. The “wood” stand was printed in PolyWood. The stand was printed on its side, in two parts, as seen in a photo above, to reduce extrusion stops and starts where stringing might occur. Inside the flowerpot is Wilbur Jr., son of Molly and Casey’s spider plant Wilbur.
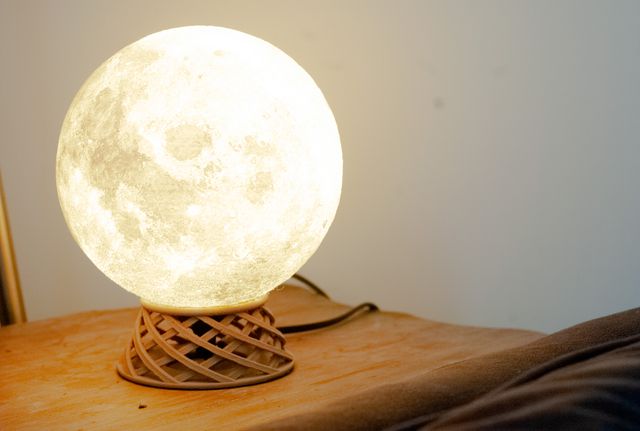
Designer Moon Lamp by Frank Deschner. Woven “wood” base designed by me and printed in PolyWood. This required a lot of pretty tedious cleanup of stringing.